

How I transformed my old tiles with microcement, without ripping the bathroom apart

If your bathroom tiles have seen better days, but the thought of smashing everything off the walls fills you with dread, then a microcement over tiles project might be exactly what you need.
I have used microcement many times over the years and honestly, I still think it is one of the best ways to completely transform a space without loads of demolition, dust, and expense. I love the soft, seamless finish it gives and how it instantly creates that minimalist starting point, a blank canvas to take in any direction you want.
For this project, I used a Concrete Lab over-tiles microcement kit to go directly over existing tiles and completely change the look of the room. I’ll link everything at the end as usual.
Ad info: I was sent a 5msq over-tiles microcement kit and a spreading spatula by Concrete Lab and I only had to pay for the postage, so I’m marking this as an ad for that reason. Please note, I’ve used microcement many times before and genuinely love it, so, as always, you’re getting my full and honest opinion in this post. Concrete Lab have offered all my followers on Instagram a discount code – use CDS10 at checkout for 10% off everything.
Why I chose microcement instead of ripping the tiles out
Before you start planning expensive tile removal or reaching for tile paint, it is worth considering whether your existing tiles are actually a good base to work from.
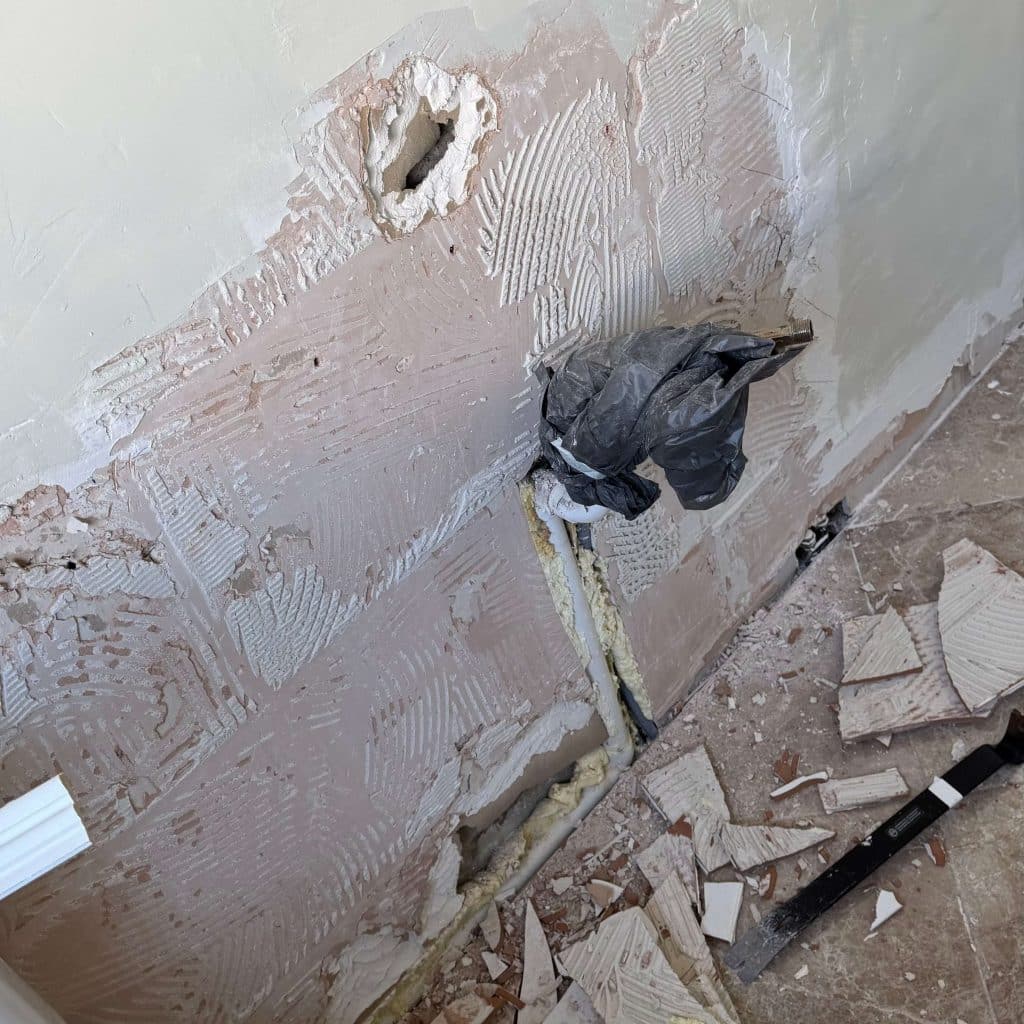
One of the biggest advantages of microcement is that it can usually be applied directly over old tiles as long as they are in good condition structurally. That means no skipping hire, no weeks of construction work, and no discovering half the plaster comes off with the tiles. For me, that is a massive win, because as you can see from the picture above where I took the tiles off on the opposite wall, it can cause a right old mess.
Microcement creates seamless surfaces with very few visible joints, so the whole room instantly feels calmer and more modern. It works brilliantly in wet areas too. Because the microcement layers are very thin, you can completely change the look of a room without adding loads of bulk.
Check out the microcement section of my blog.
What I love most about microcement bathrooms
With microcement over tiles, the seamless finish is probably my favourite thing. I absolutely hate cleaning grout lines, especially in showers where mould always seems to creep back no matter how much you scrub. (You can read my post about using grout reviver here). Covering old tiles with microcement gives you a much more continuous finish, which not only looks better but makes easy maintenance so much more realistic too.
I also love the aesthetic appeal. You get that soft, polished look that feels really contemporary without the room feeling cold or clinical. It is a perfect choice if you want:
- a modern look
- a softer, more minimalist feel
- fewer tile joints
- a durable finish
- something different from traditional tiles
Surface Preparation is Key

I cannot stress this enough. Proper preparation is the most important thing with microcement. The short answer is that even the best products will not save a badly prepared surface.
Before starting, make sure your tile surface is:
- clean
- dry
- solid
- free from grease
- free from loose grout
- structurally sound
If you have loose tiles or movement underneath, sort that first before doing anything else. The first step for me was giving everything a really thorough clean. Soap residue, dust, and bathroom products can all affect excellent adhesion later on.
Before You Start

Safety first:
Sanding a microcement surface creates concrete dust, so wear a proper mask and keep the room ventilated. I had windows open the entire time and vacuumed constantly throughout the process.
Also, read the instructions several times before mixing anything.
Once the resin and powder are combined, the drying time clock starts ticking, so you need to feel organised before you begin.
Read the instructions… more than once.
The application of microcement has precise steps and timings. Once it’s mixed, you only have a short window to apply it before it begins to set. Take time to plan the process, lay out your tools, and prep the area in advance.
Dilution matters
You’ll need to dilute several liquids in the kit – including the primer, resin mixture (combined with the microcement powder), and the sealant. Check dilution ratios carefully before adding water.
Keep clean tools
Any contamination can affect your finish. Clean buckets, spatulas, and rollers thoroughly before use.
Step 1: Prepare Your Shower Tiles
This is the most important thing for long-term success.
- Clean your tiled walls and shower floor thoroughly.
- Remove all soap residue, mould, and loose debris.
- Ensure the tiles are in perfect condition — no loose tiles or crumbling grout.
Apply the Primer


The primer application helps create a solid base for the microcement to bond to.
I mixed the Concrete Lab primer according to the instructions and applied it with a foam roller across all the wall tiles and shower tray area.
Be thorough here. You want complete coverage but not dripping wet walls.
Then leave it for the recommended drying time before moving onto the next stage.
Step 2: Mix the Microcement


This part can feel slightly pressured because once it is mixed, you need to get moving.
I used a paddle mixer attached to my cordless drill to combine the powder and resin mixture.
Top tip: mix the dry powder first before adding liquid. It massively helps reduce lumps.
You are aiming for a creamy consistency that spreads easily but still holds its shape.
Step 3: Apply the First Coat


Using a flexible spatula, I applied the first coat of microcement in very thin layers across the tile surface.
Do not be tempted to slap it on thickly. The whole system works because of multiple very thin layers rather than one heavy coat.
I worked from top to bottom so I was not dripping product onto finished sections.

While the first coat of microcement base was still wet, I pressed fiberglass mesh into the surface. This helps strengthen the coating and stops grout lines or visible joints showing through later.
Once dry, I lightly sanded the surface and vacuumed every bit of dust.
Step 4: Second Primer & Coat


Next came another diluted primer coat followed by the second layer of microcement base.
This stage starts to make everything look much more even and you really begin losing the look of the ceramic tiles underneath.
Top tip: smaller flexible tools are brilliant around awkward corners, taps, and shower fittings. I actually found a palette knife really useful in tighter spaces.
Again, leave it to dry fully before lightly sanding and vacuuming.
Step 5: Third primer & coat


Apply a third coat of diluted primer and let it dry, about 30 minutes is usually enough.
While waiting, mix a fresh batch of microcement (as above).
Apply your third layer just like the first two.
Allow to dry and then sand lightly again if necessary. Vacuum thoroughly.
Step 6: Seal the Microcement


Microcement is highly porous before sealing and in shower areas, sealing is non-negotiable.
Mix the Concrete Lab sealer according to instructions. If it’s a two-part product, use separate syringes for accurate measuring.
Apply generously with a foam roller, working across shower walls and the shower tray. Keep the surface visibly wet for maximum absorption.
Let it dry fully, and then apply additional coats as required (each coat may need a different dilution ratio, check the instructions).
💡 Top Tip: Work from bottom to top when sealing vertical surfaces. That way, any drips from above won’t mark areas you’ve already sealed (the opposite the when you were applying the first coat of microcement).
Aftercare for microcement bathrooms

Once sealed, your microcement shower enclosure will have a smooth, waterproof finish that’s easy to maintain with regular cleaning and pH-neutral products.
Thanks to the lack of grout lines, there’s nowhere for mould to hide, just a beautiful, continuous surface that’s made to last.
Tools for microcementing over tiles

Click the image above to shop any of the tools I used. The microcement DIY kit came from Concrete Lab and is available via their website.
Advantages of microcement over tiles & microcement in bathrooms generally
If you’re looking for a cost-effective way to upgrade your bathroom, microcement is the perfect choice , especially in wet rooms and showers.
The advantages of microcementing over tiles are:
- No tiles to rip out
- Durable, easy to clean
- Works in small spaces
- Great versatility across walls, floors, and even ceilings
Whether you’re after soft neutrals or a bold microcement colour, Concrete Lab’s system gives you complete creative control and a design style that’s both timeless and trending.
Is microcement over tiles or a microcement bathroom right for you?
If your bathroom is feeling more “seen better days” than “spa sanctuary,” it might be time for a refresh. But don’t rip out those old tiles just yet! Thanks to Concrete Lab’s microcement over tiles DIY kits, you can completely transform your space into a modern, minimalist dream, no messy demolition required.
Whether it’s for microcement showers, bathroom walls, microcement finishes for shower areas, or even microcement surfaces in the sink or shower enclosure, it’s the perfect choice for elevating your space.
Ready to transform your tiles?
Visit ConcreteLab.co.uk to choose your kit size, explore the range of colours, and start planning your microcement over tiles shower upgrade today.


